I really have on my list to make a tutorial for pinatas, but I just haven’t found the time to do it. With school holidays and two very energetic boys is quite difficult, especially because my youngest is 3 and I think he is too young for this activity.
But I wanted to show you few things you can do with the same technique (papier-mache).
First of all, SORRY for the crappy pictures. I was just to busy trying to finish everything on time and I ended taking pictures with flash as it was already very dark.
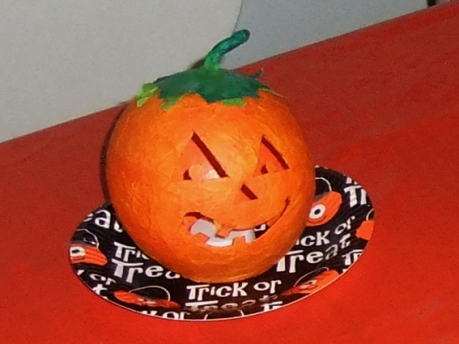
Last year I made a very small Halloween Party for my big boy and I wanted to have pumpkin lamps for the table. I wanted to show you how I made them.
To make them you will need:
– Small balloons (you check the size, it depends on the size you want it to be)
– Orange tissue paper (I used different shades of it)
– PVA glue or you can make your own papier-mache paste like this
– Battery powered candle lights like these
Inflate your balloon to the size you desire.
Tear your tissue paper in small pieces (about 5 cms). Tear lots and lots of them as we will be making about 3 layers of papier-mache.
If you are using PVA glue, mix it with water. Not so much though, it is only to soften the glue a little bit.
Now cover the balloon in glue and then put a layer of tissue paper all over the balloon (except for the part where the knot is).
I always try ways to make it have different shades, so for this I started with yellow tissue paper.
Let it dry (I just let it dry a bit as I am not very patient)
When it is dried repeat the process (glue+tissue+dry). I made the second layer with a colour between orange and yellow.
And then the last layer (orange).
Check if it is hard enough. If you think it is too soft, put another layer.
The fun part: POP THE BALLOON!!! and take the balloon out.
Carefully cut the hole to make it keep still and stand.
Now, draw the pumpkin face (I used a vanishing pen, the one you use for sewing). When you finish drawing use a craft knife or x-acto knife to cut it out, very carefully (no kids allowed in this part)
This is what you have now:
And with the light in:
Funny!!
To finish, add the pumpkin stem on the top. I made a little tube with green card (strong paper) and glue it to the top and then just put one layer of green tissue paper so it looks more uniform.
Ready, funny little table lights for each guest to take home.
And few more pictures of our decor:
I used the same technique to make party bags for one of my kid’s birthday party, but unfortunately didn’t take any picture. The process was the same (but without cutting any hole), when it was ready I filled with small toys and sweets and attach one of the toys to a string. Then I left the string hanging outside and close the ball completely with another layer of tissue paper (two layers would be fine). Each ball was a different colour, and when the kids wanted to open the ball they just needed to pull the string and the toy will do all the work breaking the ball open.
Sorry for the BEGINNER TUTORIAL, I have never done one before.
Hope you enjoyed it!!
Cheers!!


Those pumpkin faces looks great!!! and i believe….maybe…they are not so complicated…because honestly i am not so good with the handmade but anyway i will try! btw nice blog!
HAHAHAHA!!! Thanks